As the crypto market undergoes a dramatic bear period, many investors and traders are looking for networks outside of Ethereum to conduct cheaper and faster transactions. This article will provide a step-by-step guide to adding the Avalanche network to the MetaMask wallet to enable cheaper and faster transactions.
However, by default, MetaMask wallet only provides access to the Ethereum network. To utilize Avalanche’s low-cost and high throughput capabilities, MetaMask users need to manually add the Avalanche network. This article provides a step-by-step guide on how to easily add the Avalanche C-Chain network to the MetaMask wallet so that users can send, receive, and interact with Avalanche-based DApps and protocols with optimal user experience and minimal transaction fees.
TL;DR
MetaMask, one of the crypto industry’s leading multi-chain wallets, provides an easy way to add the Avalanche C-Chain network. Connecting MetaMask to Avalanche enables users to benefit from its faster transaction finality, lower gas fees and growing DeFi ecosystem while leveraging their existing wallet. This article walks through the simple process of connecting MetaMask desktop and mobile versions to the Avalanche network.
What is Avalanche?
Avalanche is an open-source platform for launching decentralized applications and enterprise blockchain deployments. It uses a novel consensus mechanism called Snow Avalanche to achieve sub-second finality with low fees. The platform aims to become the “Ethereum of accelerated blockchain applications.”
MetaMask is a cryptocurrency wallet that allows users to store Ether and ERC-20 tokens as well as access Ethereum-based DApps via its extension on Chrome, Firefox, Opera, and Brave. Over 10 million users rely on MetaMask for their crypto needs. Recently, MetaMask introduced support for multiple networks beyond Ethereum, including Avalanche, Binance Smart Chain, Polygon and others.
How To Add Avalanche Network to MetaMask Desktop Version
- Open your MetaMask wallet extension and click on current network – “Ethereum Mainnet” on top right
- Select “Custom RPC” from the dropdown list
- A popup window will allow you to add Avalanche Network

- Enter the following details:
- Network Name: Avalanche Network
- RPC URL: https://api.avax.network/ext/bc/C/rpc
- ChainID: 43114
- Symbol: AVAX
- Block Explorer URL: https://snowtrace.io/
- Click “Approve” to add the network
- Now Avalanche will be listed in the network selection dropdown
How To Add Avalanche Network to MetaMask Mobile App Version
To add the Avalanche blockchain to your MetaMask on your mobile device, follow these steps:
- Start by opening your MetaMask mobile app. Once it’s open, you’ll see the network selector dropdown. By default, it will be set to ‘Ethereum Main Network’.
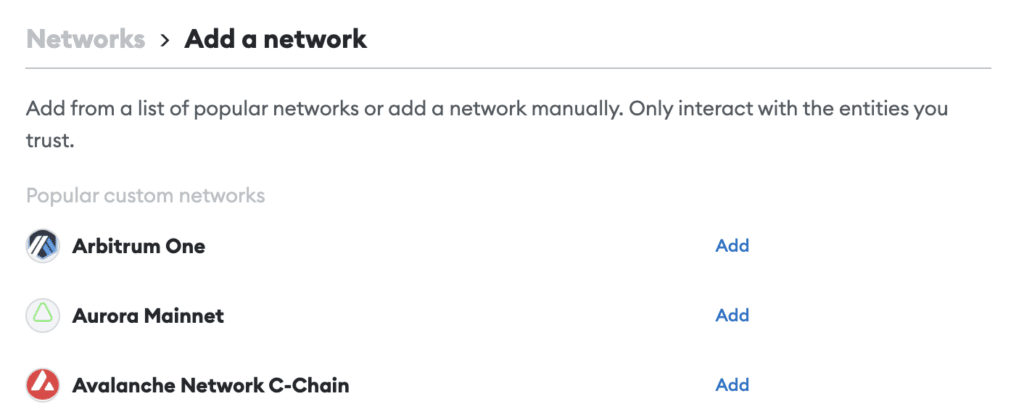
- Tap on the network selector dropdown, and you will see a list of available networks. At the bottom of the list, you’ll find a blue button labeled ‘Add a network’. Tap on this button.
- After tapping the ‘Add a network’ button, a new screen will appear with various network options. Look for the blue button labeled ‘Add’ next to ‘Avalanche Mainnet C-Chain’ and tap on it.
- At this point, you will be prompted with a confirmation message asking if you want to add the Avalanche network. To proceed, tap on the blue button labeled ‘Approve’.
- Congratulations! You have successfully added the Avalanche blockchain to your MetaMask on your mobile device. You can now switch to the Avalanche blockchain by using the network selector dropdown on the home screen of your MetaMask app.
How To Add AVAX Tokens from Avalanche to MetaMask
Now that the Avalanche network has been successfully connected to MetaMask, the next step is to transfer AVAX tokens between wallets. But first, it’s important to understand the different blockchains that make up the Avalanche network – Exchange (X-Chain), Contract (C-Chain) and Platform (P-Chain).
Only the C-Chain is compatible with MetaMask wallet transfers due to its support for smart contracts. So any AVAX held on the X-Chain or P-Chain must first be migrated to the C-Chain. To send AVAX from Avalanche wallet to MetaMask, follow these steps:
- Login to your Avalanche wallet and check the blockchain where your AVAX tokens reside by looking at the “Balance” section.
- If on the X-Chain or P-Chain, click “Cross Chain” and select “C-Chain” as the destination to transfer AVAX for a small fee.
- Once on C-Chain, go to “Send” and select “C” as the source chain.
- Copy your MetaMask wallet address, paste it into the “To Address” field on Avalanche wallet, and enter the amount.
- Check that sufficient gas fees are available for the transaction before confirming.
- Once validated on the blockchain, the AVAX transfer will be complete and visible in MetaMask.
More Compatible Wallets for Storing AVAX
While MetaMask offers the most seamless Web3 experience across multiple chains, here are some additional hot and cold wallet options that support AVAX:
Coinbase Wallet:
- Popular custodial wallet with good UX and 2FA security for beginners.
- Allows fiat on-ramps through Coinbase exchange integration.
- Supports over 500 cryptocurrencies including AVAX, DOT, BTC, ETH, LTC, DOGE, etc.
- Provides up to 8% APY on staked assets.
- One of the best wallets for beginners.
Trust Wallet:
- Feature-rich non-custodial wallet with cross-chain DApp bridging and staking capabilities for advanced users.
- Allows you to stake and earn rewards on supported assets like DOT, AVAX etc.
- Supports over 1000 coins including AVAX, DOT, ETH, BTC, etc.
- Secure self-custodial wallet.
- Good for advanced crypto users.
Ledger Hardware Wallets:
- Cold storage for long-term holding of AVAX private keys like the Ledger Nano S/X.
- Integrates with Avalanche protocol and allows staking of AVAX.
- Supports over 5500+ coins including BTC, LTC, ETH, AVAX, MATIC, DOT, Chainlink, etc.
- Very secure as private keys are stored offline.
- Best for safely storing AVAX long-term without risks of online thefts.
Overall, users now have flexible choices on how to safely manage AVAX while leveraging its fast and low-cost network benefits through integrated wallets like MetaMask. Proper blockchain, wallet and private key management remains key for minimizing tax obligations and losses from potential hacks.
Why Use Avalanche?
Avalanche blockchain aims to deliver higher transaction throughput than Ethereum by utilizing “sub-networks” that can operate in parallel. Its “Snow Avalanche” consensus mechanism achieves finality in under two seconds with very low fees. Investors like Polychain Capital and Three Arrows Capital have backed Avalanche with substantial funding. At approximately 700 transactions per second, it outperforms Ethereum in scale. Recent integration with Ethereum sidechains like Aurora will further boost interoperability.
Aside from low-cost transactions, Avalanche’s fast settlement time enables novel use cases including paywalls with micro-payments, metaverse experiences requiring real-time interactions, and high-frequency trading systems. Some of the highest-utilized applications on Avalanche include decentralized exchanges like Trader Joe and Pangolin, lending protocols like End.Finance and Benqi, BattleBox’s esports wagering platform, and artists utilizing platform’s unique NFT features.
Tracking and Reporting Avalanche Transactions for Taxes
With the increasing adoption of cryptocurrencies like Avalanche, properly reporting digital asset transactions for crypto tax purposes is becoming more important. This can be difficult to do manually given the number of on-chain transfers that may occur throughout the year.
Fortunately, there are crypto tax calculation platforms that simplify this process. One such service is CoinLedger, which allows users to track changes in their portfolio value, profit/loss calculations, and generate pre-filled tax forms.
To track Avalanche transactions using CoinLedger:
- Sign up for a CoinLedger account
- Verify your identity to access tax report features
- Click “Add Wallet” and select Avalanche
- Paste your public Avalanche wallet address
- CoinLedger will automatically retrieve all transaction data from the Avalanche blockchain
- Your portfolio balance, asset cost basis and tax liabilities will update in real-time
- You can repeat the process for any other wallets, exchanges or blockchains
- When tax season arrives, generate your reports with all the necessary figures
Over 400,000 users rely on CoinLedger to effortlessly track crypto transactions across multiple blockchains. This provides an seamless way for Avalanche holders to monitor their portfolio performance and comply with reporting requirements. With just a few clicks, all capital gains, profits and losses will be calculated as per the latest IRS guidelines.
Proper documentation of transactions through crypto tax software solutions like CoinLedger ensures investors avoid penalties for inaccurate or missing filings during an audit. It also keeps users compliant as the regulatory landscape around digital currencies continues to develop.
Conclusion
The article provided a clear guide for MetaMask users to easily add the Avalanche network and access its DeFi ecosystem with near-instant transactions at a fraction of the cost compared to Ethereum. Given the burgeoning decentralized applications and tools emerging on Avalanche, connecting one’s existing MetaMask wallet can unlock opportunities for savings as well as earnings from innovative use cases. With low barriers to entry, Avalanche promises accessible entry into decentralized protocols, furthering the adoption of crypto as a plausible spending and earning rail.


