The complete 2026 walkthrough, verified RPC details, both setup methods, mobile support, testnet switching, and troubleshooting for every common error.
- What Is Astar Network?
- Which Astar Network to Add?
- Verified Network Parameters (2026)
- Method 1: Add via ChainList (Recommended)
- Method 2: Add Astar Manually
- Adding Astar on MetaMask Mobile
- Switching Between Astar Mainnet and Shibuya Testnet
- Troubleshooting Common Issues
- Security Tips for 2026
- Frequently Asked Questions
Quick Answer: How to Add Astar Network to MetaMask
- Open MetaMask, click the network dropdown at the top, and select “Add Network”.
- Choose “Add a network manually” at the bottom of the page.
- Enter the Astar network details below and click“Save”.
- Click “Switch to Astar” to start using the network immediately.
| Network Name | Astar |
| Chain ID | 592 |
| RPC URL | https://evm.astar.network |
| Currency Symbol | ASTR |
| Block Explorer | https://astar.subscan.io |
2026 Update: Astar zkEVM was officially shut down on March 31, 2025. All its RPC endpoints, bridges, and contracts are disabled. If you used Astar zkEVM before, your assets there may be inaccessible. This guide covers Astar EVM Mainnet (Chain ID: 592), the current, active chain, and the Shibuya testnet. Do not use any zkEVM network parameters you find in older guides.
What Is Astar Network?
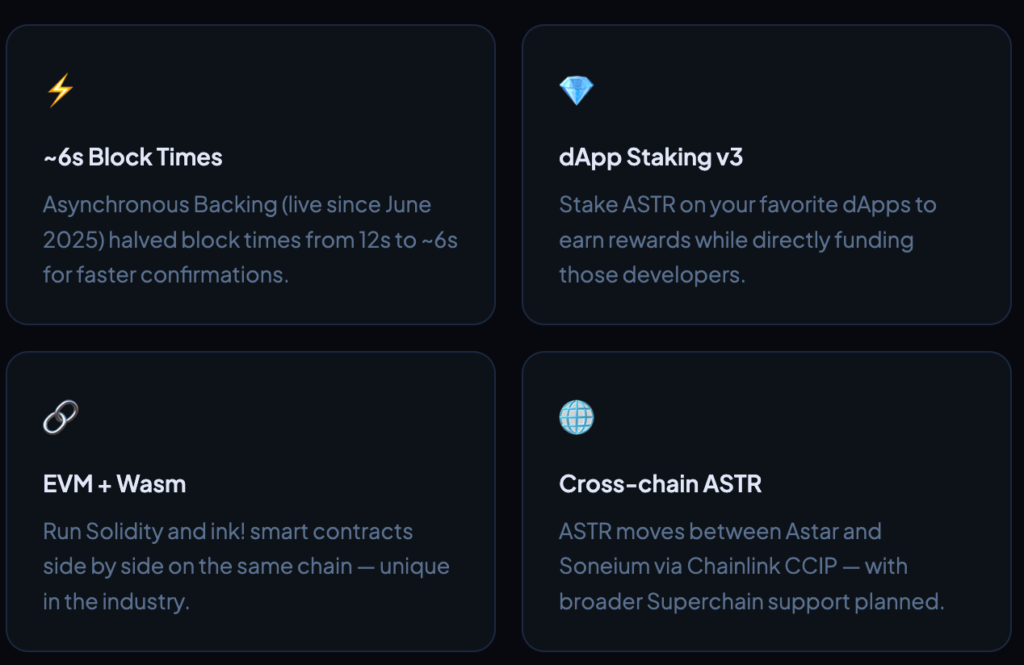
Astar is a Polkadot parachain built for smart contracts. It supports both EVM (Ethereum Virtual Machine) and WebAssembly (Wasm) runtimes simultaneously, meaning you can deploy Solidity contracts alongside ink! contracts on the same network, which no other major L1 supports natively.
That EVM compatibility is why MetaMask works with Astar: MetaMask is designed for EVM chains, and Astar’s EVM layer speaks the same language as Ethereum. Once added, you can use Astar dApps, hold ASTR tokens, and interact with DeFi protocols directly from your existing MetaMask wallet.
In 2025, Astar underwent significant changes: it activated Asynchronous Backing (reducing block times from ~12 seconds to ~6 seconds), moved to flexible blockspace via Agile Coretime, shut down its zkEVM, and expanded cross-chain ASTR movement to Soneium, a Layer 2 developed by Sony Block Solutions Labs. Tokenomics 3.0, targeting a fixed ASTR supply cap, is expected to activate in 2026.
Which Astar Network to Add?
Astar has multiple networks. Choosing the right one before you start saves you from connection errors and wasted time.
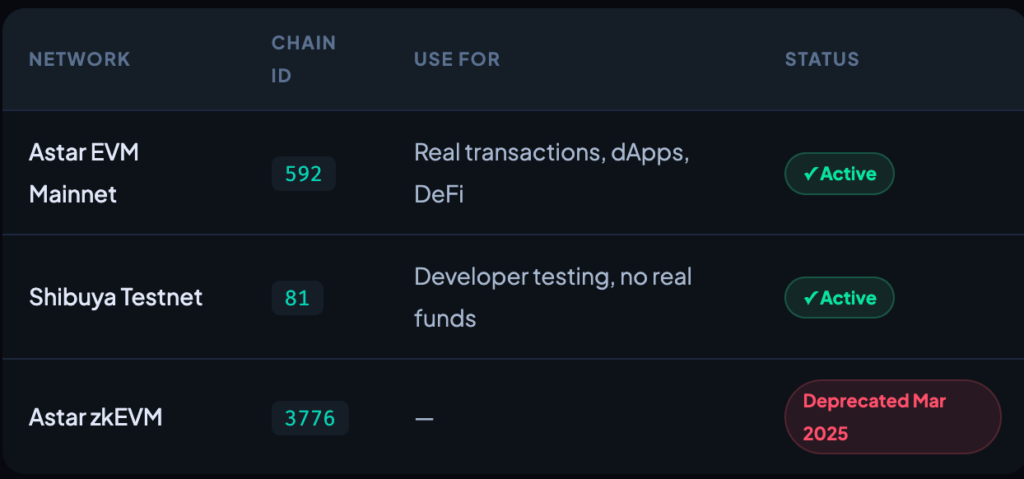
Not a developer? Add Astar EVM Mainnet (Chain ID: 592). This is where all real dApps, tokens, and DeFi activity happen. Shibuya uses test tokens with no real value and is for developers only.
Verified Network Parameters (2026)
These parameters are current as of early 2026. Use them for manual MetaMask setup or to verify a network you’ve already added.
Astar EVM Mainnet
| Parameter | Value |
|---|---|
| Network Name | Astar |
| Chain ID | 592 |
| Currency Symbol | ASTR |
| RPC URL | https://evm.astar.network |
| Block Explorer | https://astar.subscan.io |
Shibuya Testnet
| Parameter | Value |
|---|---|
| Network Name | Shibuya Testnet |
| Chain ID | 81 |
| Currency Symbol | SBY |
| RPC URL | https://rpc.shibuya.astar.network:8545 |
| Block Explorer | https://shibuya.subscan.io |
Always cross-check RPC URLs: Verify any RPC URL against chainlist.org/chain/592 or the official Astar docs before entering it manually. Malicious sites sometimes register look-alike domains with altered RPC endpoints designed to intercept transactions.
Method 1: Add via ChainList (Recommended)
ChainList automatically fills in all parameters, no manual typing, no typos. It’s the fastest and lowest-risk method.
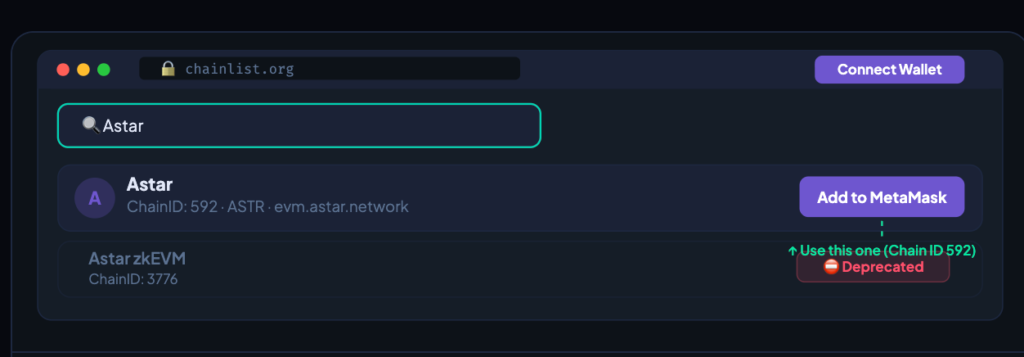
Step 1 – Go to chainlist.org and connect your wallet
Type Astar in the search bar. Look for the result showing Chain ID: 592 — that is the Astar EVM Mainnet. Ignore any zkEVM results (deprecated).

Step 2 – Go to chainlist.org and connect your wallet
Navigate to chainlist.org. Double-check the URL — bookmark it to avoid phishing copies. Click “Connect Wallet” in the top-right and approve the MetaMask prompt.
Step 3 – Search for “Astar”
Type Astar in the search bar. Look for the result showing Chain ID: 592 — that is the Astar EVM Mainnet. Ignore any zkEVM results (deprecated).
Step 4 – Click “Add to MetaMask” and approve
Click “Add to MetaMask” next to the Astar mainnet result. MetaMask will open a confirmation popup showing the network details. Review them, then click “Approve” followed by “Switch Network”.
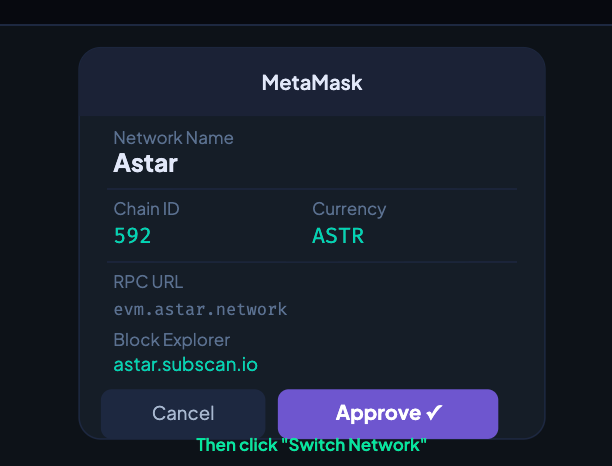
That’s it, Astar will appear in your MetaMask network selector. You can now send ASTR, interact with dApps, and use dApp Staking directly from MetaMask.
Method 2: Add Astar Manually
Use this if ChainList is unavailable or you want to choose a specific RPC provider for better performance.
Step 1 – Open the MetaMask network selector
Click your current network name at the top of the MetaMask popup (e.g. “Ethereum Mainnet”). A dropdown of your saved networks will appear.
Step 2 – Navigate to “Add a network manually
Click “Add Network” at the bottom of the dropdown, then on the next page choose “Add a network manually” at the bottom.
Step 3 – Enter the Astar Mainnet parameters
Copy and paste each field from the table above. Pay close attention to the Chain ID — it must be 592.
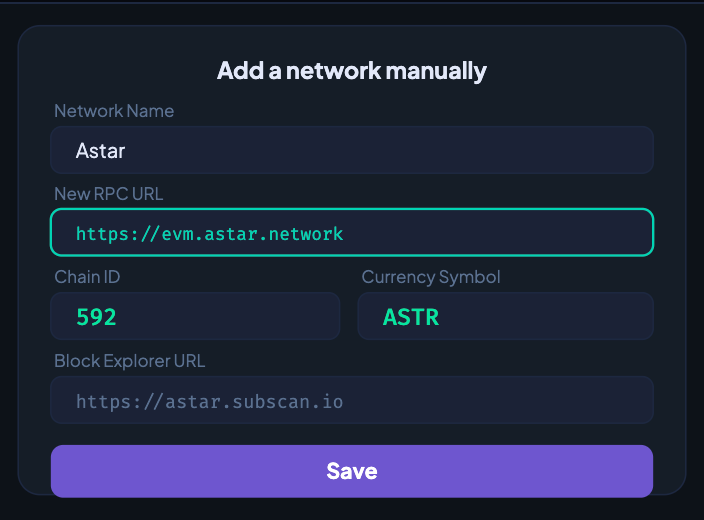
Step 4 – Save and switch
Click “Save”. MetaMask will confirm the network was added and prompt you to switch then click “Switch to Astar” to activate it immediately.
Adding Astar on MetaMask Mobile
The MetaMask mobile app (iOS and Android) fully supports Astar. Two options:
Mobile — App Settings
Via Settings → Networks: Tap the hamburger menu (top-left) → Settings → Networks → Add Network → Add a Network Manually. Enter the Astar mainnet parameters from the table above, then tap Add.
Mobile — Easiest
Via ChainList in the built-in browser: Open the built-in browser inside the MetaMask app, navigate to chainlist.org/chain/592, and tap “Add to MetaMask”. It connects directly to your mobile wallet.
Switching Between Astar Mainnet and Shibuya Testnet
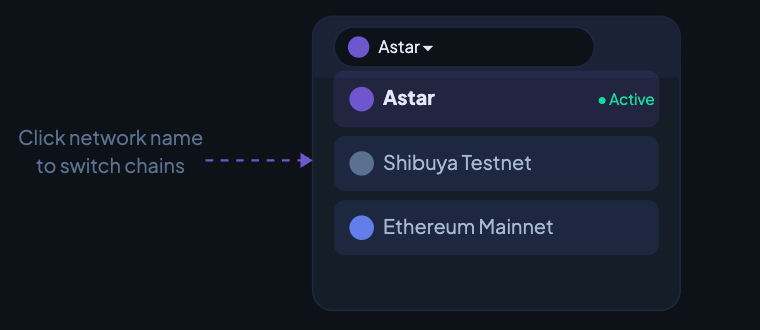
If you’re a developer, you may want both Astar Mainnet and Shibuya Testnet saved in MetaMask and switch between them as needed.
Add both networks using either method above — mainnet first (Chain ID: 592), then repeat the steps for Shibuya (Chain ID: 81). Once both are saved, you can switch between them in seconds by clicking the network dropdown in MetaMask and selecting the one you need.
Important: The Shibuya testnet uses SBY tokens with no real-world value. Test tokens can be obtained from the Astar faucet. Never send real ASTR to a Shibuya address — they are different chains and the funds will not arrive.
Troubleshooting Common Issues
⚠ “Could not fetch Chain ID” when adding manually
The RPC URL may be typed incorrectly or the server is temporarily down. Double-check you’ve entered https://evm.astar.network exactly. If it persists, visit chainlist.org/chain/592 and use ChainList’s one-click method instead, which auto-selects a healthy RPC server.
⚠ “This Chain ID is already added”
Astar is already in your MetaMask network list. Open the network dropdown, find “Astar”, and switch to it. No need to re-add. If the existing entry has an outdated or broken RPC, go to Settings → Networks → Astar → edit the RPC URL field.
⚠ Network added but ASTR balance shows as $0 or doesn’t appear
First confirm you’re on Astar Mainnet (not Ethereum or Shibuya). Then check that you’ve actually sent ASTR to that address — your MetaMask address is the same on all EVM chains, but balances are chain-specific. Verify your balance on astar.subscan.io by pasting your address.
⚠ Transactions are pending or slow
The public RPC at evm.astar.network occasionally experiences high load. Try switching to an alternative RPC provider: Alchemy and 1RPC (1rpc.io/astr) both support Astar with better uptime guarantees. You can update your RPC URL in Settings → Networks → Astar without re-adding the network.
⚠ I sent ASTR to an Astar zkEVM address, are my funds lost?
Astar zkEVM was shut down March 31, 2025. Its bridges and RPC endpoints are disabled. If you sent assets after this date, recovery may not be possible. For any funds sent before shutdown that were not withdrawn in time, contact Astar support via their official Discord for guidance.
⚠ dApp shows “wrong network” even after adding Astar
You have Astar in your network list but haven’t switched to it. Click the network name at the top of MetaMask and select “Astar” from the dropdown. The dApp will detect the switch and reconnect automatically. If it doesn’t, disconnect and reconnect your wallet on the dApp.
Security Tips for 2026
The threats facing crypto wallet users have grown more sophisticated. Adding custom RPC networks is a low-risk action, but a few habits protect you from the most common attack vectors:
- Never enter your seed phrase during any network setup process. MetaMask will never ask for your seed phrase when adding a network — if any site does, it is a phishing attack.
- Bookmark official sites. Before adding any RPC URL, verify it matches what’s listed on chainlist.org/chain/592 or docs.astar.network. Typosquatting domains (e.g. “chainlist.net” instead of “.org”) exist specifically to serve malicious RPC endpoints that redirect transactions.
- Use a privacy-preserving RPC. Standard public RPC nodes can log your IP address alongside your wallet address. 1RPC.io offers an Astar endpoint that strips request metadata before forwarding — a meaningful privacy improvement for regular users.
- Consider a hardware wallet. If you hold significant ASTR, pair MetaMask with a Ledger or Trezor device. The hardware wallet signs transactions offline, so even if your browser is compromised, funds cannot be moved without physical confirmation on the device.
- Verify token contracts before trading. On Astar, fake tokens that mimic legitimate ones are common. Always confirm token contract addresses through astar.subscan.io or the official project documentation before interacting with them.
Frequently Asked Questions
Can I use the same MetaMask address on Astar as on Ethereum?
Yes. Your MetaMask address is identical across all EVM-compatible chains. Astar EVM, Ethereum, and BNB Chain all share the same address format. However, your balances are chain-specific, ASTR on Astar does not appear on Ethereum and vice versa.
What is the difference between Astar EVM and the Substrate (native) side of Astar?
Astar has two account types: H160 (EVM, compatible with MetaMask) and SS58 (Substrate-native, used with Polkadot.js wallet). MetaMask only connects to the EVM side. For full Substrate functionality — including native governance and certain parachain features, you need Polkadot.js or a compatible Substrate wallet.
Is there an official MetaMask integration from Astar directly?
Astar’s official portal at portal.astar.network supports direct MetaMask connection and can automatically configure your wallet for Astar Mainnet when you connect. It’s a reliable alternative to ChainList for first-time setup.
What are the main dApps I can use on Astar after connecting MetaMask?
ArthSwap is the leading DEX on Astar for swapping and liquidity provision. The Astar Portal itself lets you access dApp Staking directly from MetaMask. Stargate Finance supports bridging between Astar and other chains. Additional projects include SiO2 Finance (lending) and various NFT platforms.
What wallets besides MetaMask work with Astar EVM?
Any EVM-compatible wallet works: Rabby Wallet, Coinbase Wallet, Trust Wallet, and Rainbow all support Astar by adding the same network parameters. Astar’s roadmap also references integration with the Startale App, a unified “super wallet” planned for 2026 that will manage ASTR across both Astar and Soneium.
Does adding Astar to MetaMask cost anything?
No. Adding a network is always free. Gas fees are only charged when you execute transactions on that network, and Astar’s fees are a fraction of a cent for most operations.
team of 15 content editors collaborates with crypto journalists globally to provide the best and most up-to-date crypto news.